Exits and risk controls
How the desk gets you out of a trade, and the limits that stop it (or you) from getting into one. Exits manage every open position on the desk, manual or automatic. Risk limits only ever block new entries; they never block an exit.
Software stops
The take profit, stop loss, trailing stop, hard stop, volume-fade exit and LULD escape are software stops. They live in the program, on your computer. They are not resting stop orders at your broker.
Nothing protects a position when the program is not running, when the computer sleeps, when the network drops, or when the market data stops arriving. If a stock gaps through your level while the program is not watching, there is no order at the venue to be triggered. If you need a stop that survives the program being closed, place it at your broker.
A separate circuit breaker program watches the desk's heartbeat and can flatten your positions if the desk freezes. It only works while it is running, starts in alert-only mode every time, and sends nothing until you arm it. It is a last resort, not a stop loss.
Every level on the ladder, the chart and the cost readouts is calculated from the last price the desk has seen. What you actually get is decided by the venue: slippage, partial fills, the spread, halts, limit-up/limit-down bands and rejections all change the real number.
Auto exit and units
- Auto exit (one for each side) switches that side's software exits on or off. On: take profit, stop loss, trailing and step lock, volume fade, red-candle exit, hard stop, scale-out and the LULD escape manage that side's positions, manual trades included. Off: none of them run for that side, and only you can close those trades. The desk warns you when you switch it off.
- Fleet positions carry their own profile's exits, fixed when they entered.
- Units (per side):
%reads take profit, stop loss and trail after as a percentage of the entry price, so the level does not change with share count.USDreads them as dollars for the whole position, so the price level moves with the size.
Take profit and stop loss
| Setting | What it does |
|---|---|
| TP | Take profit, in the side's units. The whole position closes when price reaches it. 0 is off (only the stop loss and trailing exits close the trade). |
| SL | Stop loss from entry, in the side's units. The backstop: trailing and hard stops usually act first. It is also the trailing gap when no trail width is set. |
You can also drag TAKE PROFIT and STOP LOSS on the trade ladder.
Trailing stops
Tick Trailing TP/SL (long) or Trailing (short). Once the trade is Trail after (+) in profit, the stop follows the best price and only ever moves in your favour. Before that, the fixed take profit and stop loss rule alone. How the stop follows depends on which of these you use:
| Trail type | How it follows price |
|---|---|
| Trail width | The classic trail, and the alternative to the step lock. Once armed, the stop sits this far behind the best price and moves up with it, smoothly, instead of in steps. It is clamped so the risk never exceeds your stop loss from entry. Tight banks fast; wide gives a runner room. 0 means use the SL distance. It runs only while step % is 0 - set a step % and the step lock takes over and the width is ignored. |
| step % | Step lock. Reaching Trail after makes that level the stop (the first step is banked, less slippage), and each further step the price makes moves the stop up one step. The ladder shows the NEXT STEP. A step lock overrides the other trail types, Trail width included: use one or the other, not both. |
| ATR x | A Chandelier trail: the stop hangs this many ATRs (average true range, on 60-second candles) behind the best price since entry, so it is wider when the stock is thrashing and tighter when it is calm. Until enough candles exist, the classic width is used and the log says so. |
| widen % / per % | Makes the trail change as the move extends. A positive widen gives a runner more room each time it moves another "per %"; a negative widen tightens it to lock in profit. A tightening trail never shrinks below a fifth of the width you set. Both boxes are needed. |
| SAR | A Parabolic SAR trail: an absolute price that starts loose and tightens by itself the longer the move runs. SAR AF start, SAR AF step and SAR AF max set where its acceleration starts, how fast it grows and where it stops. |
| SAR exit | What happens when the SAR flips against the position. Off: the flip is logged and the trail carries on with the width rules. On: the position closes (logged as SAR REVERSE). It never opens the opposite side. |
| ST | A Supertrend trail: a band that ratchets towards price while the trend holds and never moves away. If it flips against the position, the desk logs it and falls back to the width rules; it never reverses. |
The ladder's TRAIL row always says which rule is in charge and, for a widening or tightening trail, the width in force now.
Before it arms: the TRAIL AFTER rail
While the trail is ticked but the trade has not yet reached Trail after, nothing is trailing. The ladder draws the threshold as a dashed TRAIL AFTER rail, sitting between the peak so far and the take profit, and the TRAIL row says how far off it is - so you never have to do that arithmetic yourself.
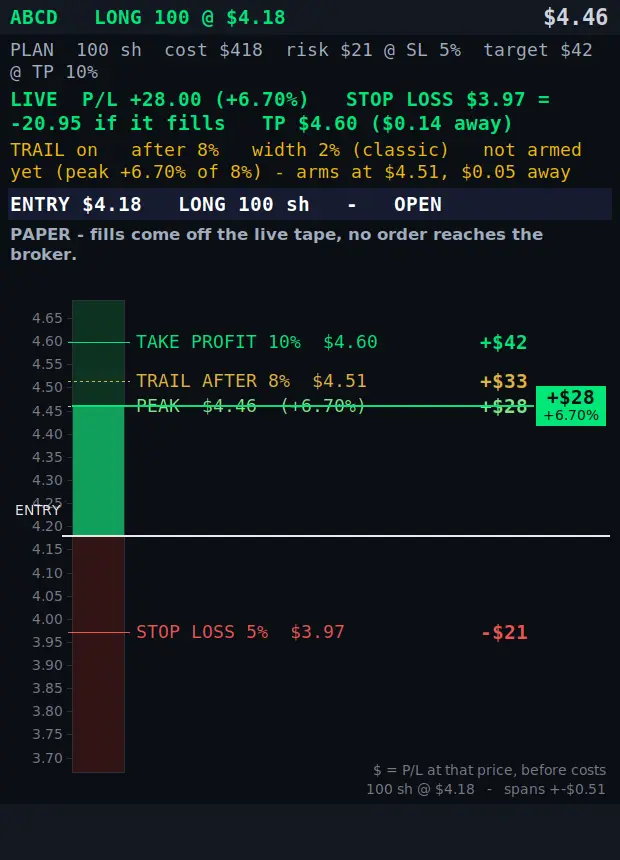
Here the trade is +6.70% ahead and Trail after is 8%, so the rail sits at $4.51 - between the PEAK $4.46 and TAKE PROFIT $4.60 - and the row reads not armed yet (peak +6.70% of 8%) - arms at $4.51, $0.05 away. Until price touches that rail the static STOP LOSS is still your exit, and it is still drawn in red at $3.97.
After it arms: the trailed stop
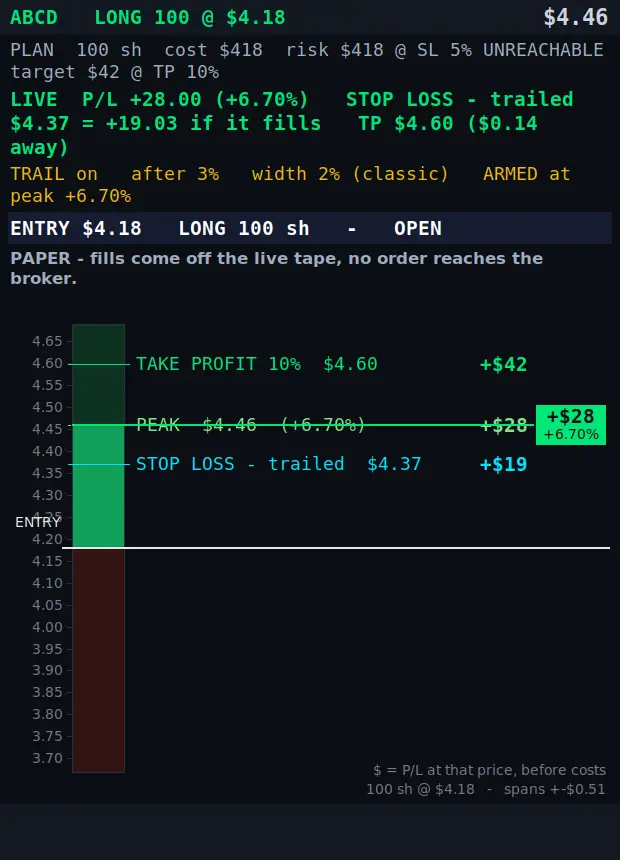
Now the threshold has been passed, so the TRAIL AFTER rail is gone and a cyan STOP LOSS - trailed rail has taken its place, following the peak down at the width 2% (classic) you set - at $4.37, which is above the entry: if it fills, the trade closes for a gain rather than a loss. Because that trailed stop is now more protective than the stop loss you set from entry, the ladder marks the original stop UNREACHABLE and stops drawing it - the trail would always get there first, so a red line at that price would not be your risk.
Other exits
| Exit | What it does |
|---|---|
| Vol fade exit | With the take profit not yet reached, exits when a completed 1-minute candle's volume falls to Fade % or less of the biggest minute since entry: the momentum is over. grace s gives a new trade time to work before this can act. |
| Red candle exit / Green candle exit | Exits the whole position on the first completed 60-second candle that closes against it. |
| Hard stop | A fixed stop price set by an entry rule, such as the retest short's stop over the high, or Stop under dip %. |
Adding and scaling
| Setting | What it does |
|---|---|
| Auto add-on / Add at (+) / Max adds | Adds to a winning position when it is this far ahead, up to Max adds times. An add re-bases the trailing stop. |
| Scale cycle short side: Scale cycle (cover into bounce) | Sells part of the position into a pullback of Pullback (-) from the peak while still in profit (Sell %), then re-adds over the high with Re-add size. The short side mirrors it with Bounce (+) and Cover %: cover into a bounce, re-add under the low. 0 re-add means sell only. |
| Re-add lift % / Re-add drop % | After the scale-out, re-add when price lifts this far off its running low since the sale (short: drops off the running high), instead of waiting to reclaim the peak. 0 is off. |
| Re-add size % | How much goes back on, as a percentage of what was sold. |
| Re-add floor | The re-add may never fill below the original entry (above it, for a short). If price goes through the entry, the cycle stops and the stop loss owns the trade. This prevents averaging down. |
| REBASE ON ADD | When the re-add fills, the stop moves to your SL distance from the add price and the step trail is measured from the add price. |
| Scale cycles | How many complete sell-then-re-add cycles one stock may run in a session. 0 means no cap of its own. |
How exit orders are sent
- Exits are sent as limit orders priced through the market by the Exit offset, so they work in every session.
- If an exit does not fill, the desk re-prices it one offset deeper, a limited number of times, and logs each attempt as an EXIT CHASE. The last automatic re-price says so in the log.
- In regular hours, when an official limit-up / limit-down band is known, a sell exit is never priced below limit-down and a cover never above limit-up (logged as EXIT AT BAND).
Halts and limit-up / limit-down
Tick Halt rules on a side to use:
- LULD escape: a short exits fast when price approaches the limit-up band, a long near limit-down. A band approached in your favour never triggers it. The escape leaves earlier by the live spread.
- Resume stop: when a halt resumes at a loss for your position, it exits immediately. If it resumes in your favour, the position is held.
- Band guard %: an automatic entry is refused while the official band against it is closer than this percentage. Estimated bands never block. 0 is off.
Manual and automatic entries on a halted stock are refused. See how halts are shown.
Risk discipline row
The row under the filters is the entry gate. It is checked before every entry, manual or automatic, when the desk is live. It never blocks an exit. In paper mode it is not applied.
When a manual entry is blocked, a window says which limit stopped it. When a limit that ends the day is reached, both automatic engines are disarmed and the desk shows DAY OVER - RISK LIMIT HIT.
| Setting | What it does |
|---|---|
| Risk discipline | Master switch for the entry gate. Turning it off applies to live trading only, and it is always back on when the program starts. |
| Max daily loss $ | At this much net loss for the day, entries stop for the rest of the day. It survives restarts. 0 is off. |
| Max trades/day | A cap on trades per day. 0 is off. |
| Pause after losses / for mins | This many losses in a row pauses new entries for that many minutes. 0 is off. |
| End day after losses | This many losses in a row ends the day's entries entirely. 0 is off. |
| Freeze settings while armed | Locks the settings boxes while an automatic engine is armed. Untick to edit while armed, at your own risk. |
| RESET DAY | Starts the day's counters again: loss total, streaks and trade count. Positions and the journal are not touched. |
| Sizing | Fixed: every automatic entry takes the Size in its settings. Risk $: shares are worked out so a stop-out loses about Risk $ per trade, capped by Max shares. |
| day / net | Today's trade count and net result as the gate counts them. |
Per-stock brakes
| Setting | What it does |
|---|---|
| Sym max/sess | The most automatic entries on one stock per session. It resets at the after-hours fresh start and the next day. 0 is off. |
| Sym loss $ | Once one stock has cost this many dollars (realized) in the session, no more automatic entries on it. 0 is off. |
| Max pos, Cooldown s | Positions per side, and seconds before the same stock may be entered again. See order handling. |