Automation
The automatic engines enter trades for you when your rules match. The long side and the short side each have their own settings, their own arm switch and their own profile. Nothing enters by itself until you arm it.
When the desk is live and an engine is armed, entries go to your broker without asking. Test your settings in paper first. Rules and profiles are tools for your own decisions; none of them is a recommendation or a promise of results.
How automation decides
An automatic entry only happens when all of these hold:
- SYSTEM is on (see the SYSTEM switch).
- That side is armed.
- The stock is on the scanner, so it passed your filters.
- An entry rule fires, and every entry filter you ticked agrees.
- The risk limits allow a new entry (daily loss, trade count, losing streak, positions per side, per-stock limits and more; see risk discipline).
- The stock is not halted, and for a short, it can be borrowed.
Once a position is open, the exits manage it, whether it was entered automatically or by hand.
Arming and disarming
- Arm a side with AUTO - LONG or SHORT on the trading panel, or ARM LONG AUTO TRADING / ARM SHORT AUTO TRADING in the AUTO/BOT window. The band above them reads AUTO TRADING: OFF until a side is armed.
- Arming first checks the risk limits and then asks you, describing that side's own settings.
- While a side is armed its settings boxes are locked, if Freeze settings while armed is ticked, so a value cannot change under a running strategy.
- Disarming never asks and never touches open positions: their stops, targets and trailing carry on, because disarming is about new entries only.
- Arming is never restored by loading a profile or restarting the program. Switching from paper to live disarms both sides.
- A live fleet slot is not controlled by these buttons: STOP FLEET or LIQUIDATE ALL stops it.
The AUTO/BOT window
AUTO/BOT in the WINDOWS row opens every automation setting, long side on the left and short side on the right, in the same order on both sides. Each field and caption has hover help in the program.
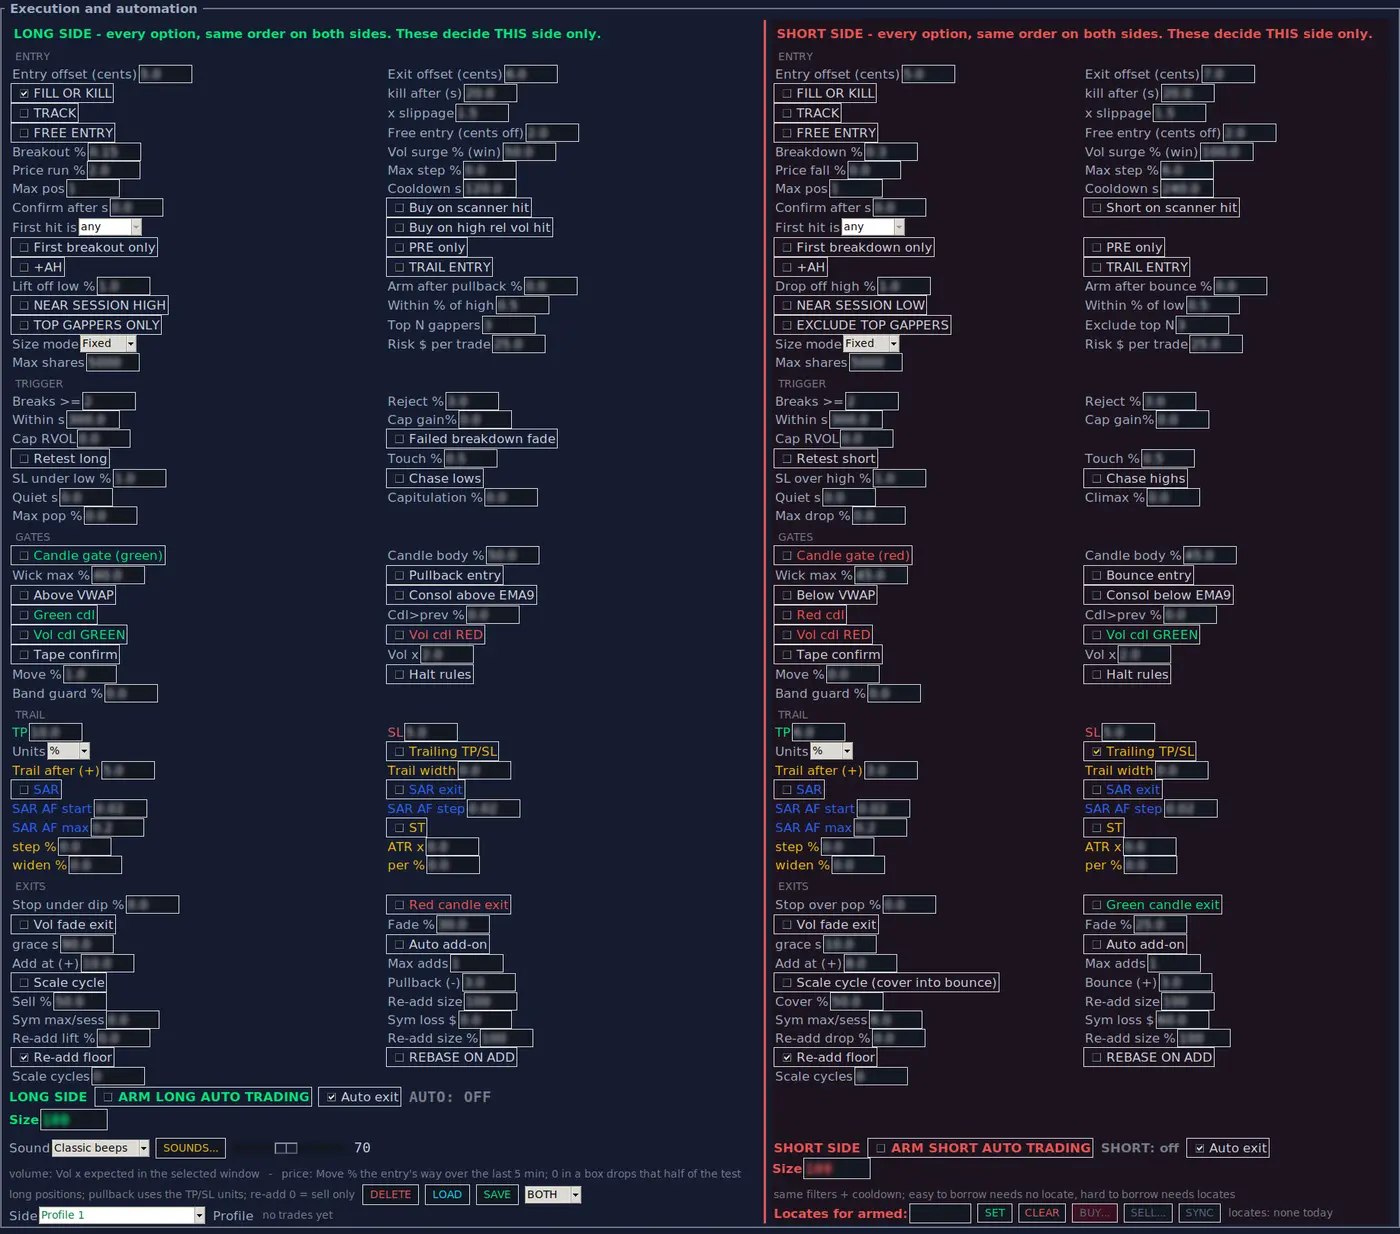
Settings are grouped into ENTRY, TRIGGER, GATES, TRAIL and EXITS. Exits and trailing are explained on the exits and risk page.
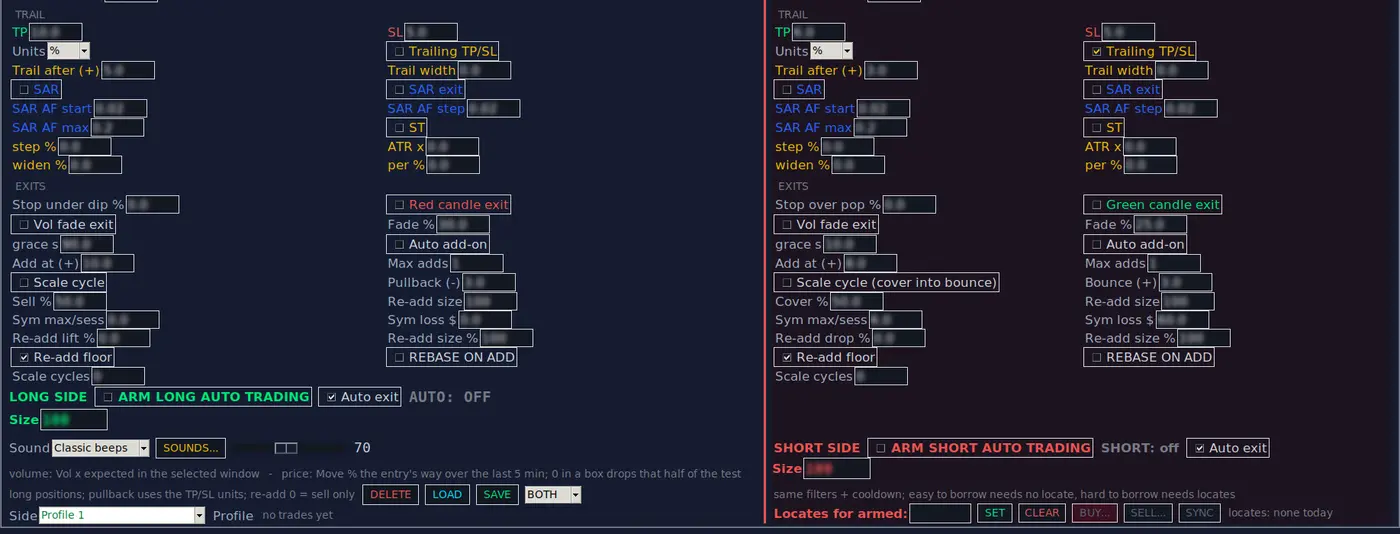
The bottom of each side is where the automation is actually switched on: ARM LONG AUTO TRADING / ARM SHORT AUTO TRADING with that side's Auto exit tick and Size, the long side's sound picker and volume, the Side profile row (DELETE, LOAD, SAVE, and which side a save covers), and on the short side the Locates for armed row.
Each side has Size (shares per entry), or Size mode set to Risk $, where the share count is worked out so a stop-out loses about Risk $ per trade, never more than Max shares. On a live short, the size is also capped by your locates.
Order handling
| Setting | What it does |
|---|---|
| Entry offset (cents) | How many cents through the price the entry limit is placed, so it fills. Bigger means a surer fill at a worse price. |
| Exit offset (cents) | The same for exits. Usually deeper than the entry offset, because getting out is the order that must fill. |
| FILL OR KILL / kill after (s) | If an entry has only partly filled and makes no progress for this many seconds, the unfilled rest is cancelled. You keep what filled. Without it, a late fill could leave shares without their exits being set up as you intended. Resting entries are never killed. |
| TRACK / x slippage | Sizes both offsets from the slippage your own recent fills actually took, times the multiplier, and never smaller than the cents you typed. |
| FREE ENTRY / Free entry (cents off) | Places the entry limit this many cents away from the market so it rests instead of crossing. On a maker/taker schedule a resting fill can be commission-free, but it may never fill. |
| Max pos | How many positions this side may hold at once. |
| Cooldown s | Seconds before the same stock may be entered again on this side. |
| Confirm after s | The shakeout wait: after a trigger, wait this long, ignore the dip, then enter on the first price back at or past the trigger. 0 is off. |
| Stop under dip % / Stop over pop % | If that wait saw a real dip (a pop, for a short), the entry carries a hard stop this far beyond it. 0 is off. |
Entry rules
These decide when a side enters. Several can be on; some exclude each other, and the window stops you ticking a combination that contradicts itself.
| Rule (long / short) | What it does |
|---|---|
| Breakout engine | The classic long rule: enter when price clears the high of day by Breakout %. Vol surge % (win) requires window volume above its recent pace, Price run % requires a steep enough move into the break, and Max step % skips breaks that jump too far past the old high (a chase, not an entry). The short side mirrors it with Breakdown % and Price fall %. |
| First breakout only / First breakdown only (shown as “Buy first breakout only” on the long side) | Only the first break of the session, never the retries. |
| Buy on scanner hit / Short on scanner hit | Takes the first scanner hit on a stock, once per session: the scanner filters are the entry rule. Pair it with Confirm after s to avoid the shakeout. It excludes First breakout only. |
| First hit is | Which hit "on scanner hit" may take: filters (the first moment of the session the stock cleared all your filters) or any (the first new-high minute however small). Live only while "on scanner hit" is ticked. |
| Buy on high rel vol hit | Long only. Takes the first "High Rel Vol - 5min 5x" alert on a stock, once per session. |
| PRE only / +AH | Scanner-hit entries only in premarket; with +AH, also after hours (from 16:00 New York time). Market hours stay excluded. |
| TRAIL ENTRY | Buys a lift of Lift off low % off the day's running low (short: a drop of Drop off high % off the running high). Arm after pullback % (short: Arm after bounce %) makes it wait until the low is that far under the day's high. The stop loss goes in with the entry. |
| NEAR SESSION HIGH / NEAR SESSION LOW with Within % of high / Within % of low | Enters when price comes back to within that percentage of a session high it had pulled back from (a session low it had bounced from, for a short). A brand-new high never fires it. |
| TOP GAPPERS ONLY / EXCLUDE TOP GAPPERS with Top N gappers / Exclude top N | Long: only trade stocks inside the top N of the top gappers list. Short: refuse to short the top N, the strongest names that tend to squeeze. Each side counts to its own number. |
Fade and retest rules
These trade a failure at a level: the classic short fades a failed break of the high; the long side can buy a failed breakdown.
| Setting | What it does |
|---|---|
| Breaks >= | How many failed pushes at the level before this side trades the failure. |
| Reject % | How far price must reject off the extreme to count as failed. |
| Within s | The rejection must come within this many seconds of the last break or touch. |
| Cap gain% / Cap RVOL | Skip the trade if the stock has already moved this far the trade's way, or its relative volume is above this. 0 is off. |
| Failed breakdown fade | Long only: buy the bounce off a failed breakdown, the mirror of the short fade. |
| Retest long / Retest short | The structural mode: track the level, wait for touches, quiet and a rejection, then enter with a hard stop just beyond the level. Touch % sets how close counts as a touch; SL under low % / SL over high % sets the hard stop. |
| Chase lows / Chase highs | Track a new extreme instead of waiting for the classic retest. |
| Quiet s | The last new extreme must be at least this old: a stock still printing highs is not a top. |
| Capitulation % / Climax % | The move into the level must be at least this big: a blow-off top to short, a capitulation flush to buy. |
| Max pop % / Max drop % | Only enter while price is still within this distance of the level. 0 is off. |
Entry filters (gates)
Gates do not start a trade; they refuse one that does not look right. Each is a tick box, saved with the profile.
| Gate (long / short) | What it requires |
|---|---|
| Candle gate (green) / Candle gate (red) | The current 60-second candle is green (red, for a short) with a solid body and little wick against the trade. Tune with Candle body % and Wick max %. |
| Pullback entry / Bounce entry | Bull-flag timing: after a red pullback candle, enter on the first candle to take out that candle's high (mirrored for shorts). Never mid-drop. |
| Above VWAP / Below VWAP | Price is on the trade's side of the session VWAP. |
| Consol above EMA9 / Consol below EMA9 | Price is holding the 1-minute EMA 9 on the trade's side and the forming minute has started to move that way. |
| Green cdl / Red cdl | The forming 1-minute candle is moving with the trade. |
| Cdl>prev % | The forming candle's body is already bigger than the previous candle's by this percentage. 0 is off. |
| Vol cdl GREEN / Vol cdl RED | Only enter while the forming candle's volume bar is up (GREEN) or down (RED, for dip-buying timing). Ticking both means it never fires. |
| Halt rules / Band guard % | Refuses an automatic entry when the official limit-up / limit-down band against it is closer than this percentage. See halt rules. |
Tape confirm
Tick Tape confirm to make the live tape agree before any automatic entry fires. Both tests must pass:
- Vol x: volume in the selected window is at least this multiple of normal for that time of day.
- Move %: price has moved at least this far the trade's way over the last 5 minutes.
0 in a box drops that half of the test. If the desk cannot measure the volume it refuses rather than letting the trade through.
Profiles
A profile is a named set of settings. At the bottom of the AUTO/BOT window:
- Profile: pick a saved profile, or type a new name.
- LOAD puts the profile's settings in every box. SAVE saves the boxes under the name in the box. DELETE removes it.
- Side:
BOTH,LONGorSHORT. With LONG or SHORT, the desk takes automatic entries on that side only while the profile is loaded. Your own clicks are never blocked, and open positions are not touched.
Settings that are "profile-saved" travel with the profile. Loading a profile never arms anything.
The profile fleet
The fleet runs up to 20 profiles side by side on the same live market, each in its own slot, so you can compare settings on the same day's stocks.

| Control | What it does |
|---|---|
| Profile (per slot) | The profile the slot trades. Blank means the slot is empty. |
| L / S | The slot takes long entries, short entries, or both. A slot's L and S override the profile's Side. |
| LIVE | Real money: this slot's entries go to your broker instead of the paper wallet (only when the desk is live). The desk asks your code before it starts. With paper on, every slot trades paper. |
| P / M / A | Sessions the slot trades: premarket (04:00-09:30), market hours (09:30-16:00) and after hours (16:00-20:00), New York time. |
| MAX LIVE OPEN | The most real-money positions the whole fleet may hold at once, across all live slots. |
| START FLEET | Starts every filled slot. |
| SAVE SET | Remembers this arrangement of slots as the last-used set (the schedule can start it). |
| STOP FLEET | Stops every slot taking new entries. Open fleet positions are not closed: use FLATTEN ALL for that. |
Fleet trades are recorded under their profile name, so JOURNAL and ANALYSE can compare profiles: in paper they go to the paper journal; with the desk live, simulated slots keep their own fleet journal and a LIVE slot's real fills are booked in the real journal. Each position uses its own slot's profile exits. Simulated slots have their own throwaway limits; an entry from a LIVE slot is checked by the real desk (MAX LIVE OPEN, SYSTEM, risk limits and locates).
The paper schedule
Right-click SCHED to open the PAPER SCHEDULE; left-click turns it on or off.
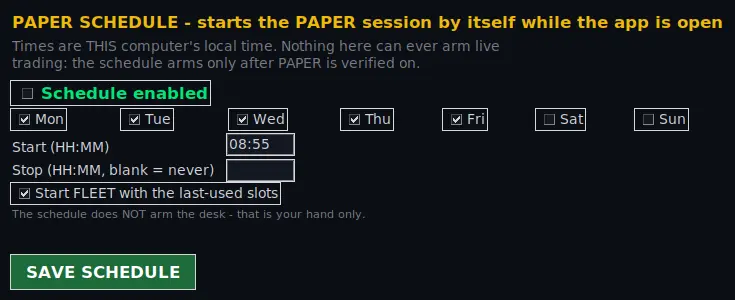
- Schedule enabled, the days, Start and Stop (HH:MM on your computer's clock; blank stop means it never stops paper by itself).
- At the start time the desk switches paper on, and starts the fleet with its last-used slots if Start FLEET is ticked. At the stop time it switches paper off.
- The schedule only works while the program is open, and it never arms live trading: that is always your own action.